Home Automation
Modified:
Introduction
Note
Although I am not a qualified electrician, my electronics qualification and practical experience in the electrical and electronics industry ensure I am competent to perform electrical work. All work I undertake is inspected, tested, and formally signed off by a NAPIT‑registered electrician.
It’s just too difficult to turn a light switch on or off these days! 😄 I love remote control and automation, and control systems in general. Implementing some sort of home automation has always been something I wanted to do. Interestingly, home automation is not a new thing… It’s been around since the 70s!
Checkout this video showing X-10 products from the 80s/90s:
Home automation was not very popular, practical or affordable back then. I had never heard of these products back in the 90s, which was probably not surprising considering that the only thing I was interested in back then was playing Quake and Doom II on a 486 PC!
Home automation has gradually become more accessible, affordable and mature, with some great products on the market today.
My Home Controls
I have a range of home controls for various functions:
Motion-triggered lights
Turn on a light when motion is detected via an automation:
- Front door external
- Entrance hall
- First floor landing
- Dining room
- Study
Scenes
Activated manually via dashboard or remote:
- Dining Room
- Set ceiling and wall unit lighting, turn on amplifier for music
- Piano Room
- Turn on ceiling and wall lights, sockets for amplifier and TV
- Lounge
- Switch between bright lights and TV lights
- Study
- Set ceiling lights banks 1-3
- Set desk LED strip lighting brightness and colour
- Turn on spotlights
- Simple button control (Shelly i4) automations for different light levels
Heating and Water
Controlled by automations and schedules:
- Full room level heating monitoring and control
- High pressure water pump turns on of off on schedule
See the Hive Heating Replacement project for more info.
Products
Starting out, home automation can be quite daunting. The market is a bit of a minefield, with various platforms and products, most not working well together, with some requiring gateways / hubs, cloud accounts. Interoperability, ease of installation and privacy are significant considerations for me (and likely many others) when choosing home automation products.
Just before this, I had been researching different home automation options and came across the Shelly range. I am glad I did, because Shelly devices turned out to be a perfect fit for the level of integration I wanted. They are compact, affordable, and work well with a variety of home automation platforms. Before discovering them I had no experience with other brands or ecosystems.
Some of the features of the Shelly mainstream control products are:
- Small – fit into back boxes
- WiFi connectivity with built-in web page for configuration
- WiFi access point for initial configuration to connect to the network
- Bluetooth
- No hub required
- No cloud account required
- HTTP, REST, MQTT protocols
- Mature Integration in Home Assistant
I have since installed many Shelly products: dimmers, relays, RGBW controllers, temperature and humidity sensors, thermostatic radiator valves, door / window sensors, and motion detectors.
Shelly devices expose a wireless access point, so that you can connect to and configure the device, and the first step is usually to connect it to the WiFi network, followed by updating the firmware.
Once they are on the network, you can program them to interact with each other via HTTP, or connect them to a home automation platform such as Home Assistant.
For cameras I chose TP Link Tapo C320WS cameras for the following reasons:
- Good value, mid-range camera
- 2K QHD – 2560×1440
- Excellent night vision for the price
- No cloud subscription
- Ethernet or dual band WiFi
- Operates while away from home without opening ports via app
- Easy to install and configure via app
- Works perfectly in Home Assistant
- ONVIF and RTSP support
- Spotlight and siren
- AI motion detection, people and zone detection – triggers recording on local SD card and sends notifications
- Two-way audio
Home Automation Platforms
Home Assistant
After reviewing various platforms, I settled on Home Assistant. Compared to other smart home platforms, Home Assistant stands out due to its extensive customization options, open-source nature, local control over devices, a large range of supported integrations, and a strong community, allowing users to deeply personalize their smart home automation with a high level of flexibility and privacy compared to cloud-based systems.
Home Assistant offers the following benefits:
- Total local control – no cloud or vendor lock-in
- Integrations for a wide array of devices
- Advanced automation logic
- Highly configurable
- Ecosystem‑agnostic
- Extensible with plugins and integrations
- Privacy
- Scalability
- Docker container available
- Long‑term ownership – portable, backup‑friendly, and not tied to any vendor or hardware
Scenes are one of the stand-out features of Home Assistant. They let you define the exact state of multiple devices (lights, media players, thermostats, switches) and activate them all at once. You can define multiple scenes, each with preset configurations for different devices. When a scene is activated, all included devices instantly adopt their assigned states.
Scenes can be embedded directly into automations and scripts. You can activate a scene when someone arrives home, presses a button, activates a motion detector, or at a scheduled time.
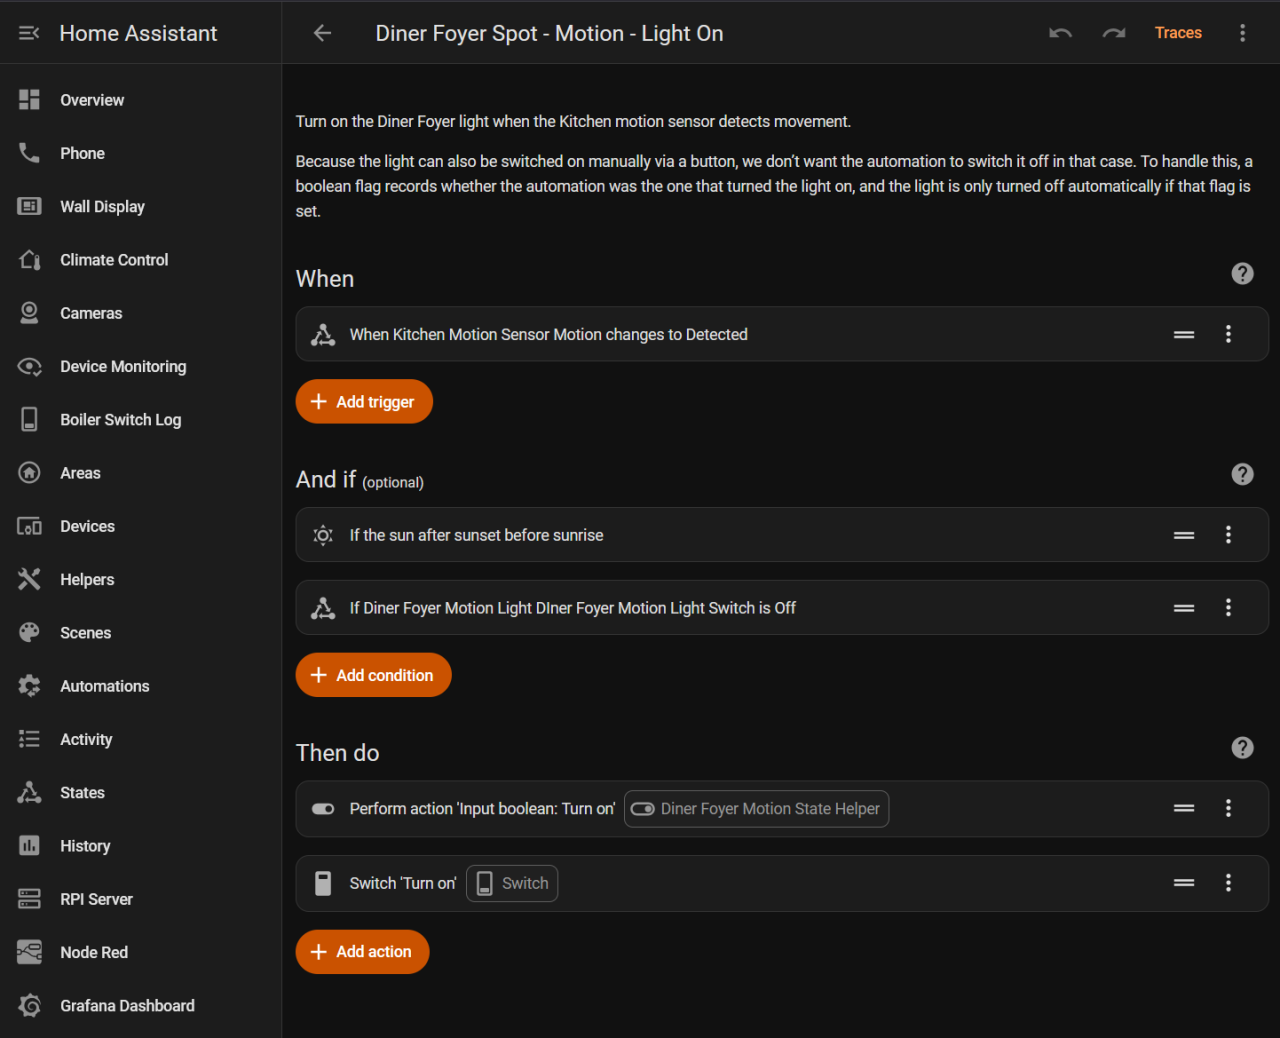
Automations in Home Assistant are deceptively powerful. Each one is built from three core parts:
- Triggers: Events that start the automation, such as a button press, motion detection, a scheduled time, a timer finishing, or even your location.
- Conditions: Optional checks that use Boolean logic to evaluate anything in Home Assistant, like a numeric value, the current time, sunrise or sunset, outdoor temperature, and more.
- Actions: What the automation actually does: turn devices on or off, adjust brightness, change a thermostat setting, send a notification, and so on.
Here I am using a Shelly BLU Motion PIR detector to switch on a single spot light for 30 seconds:
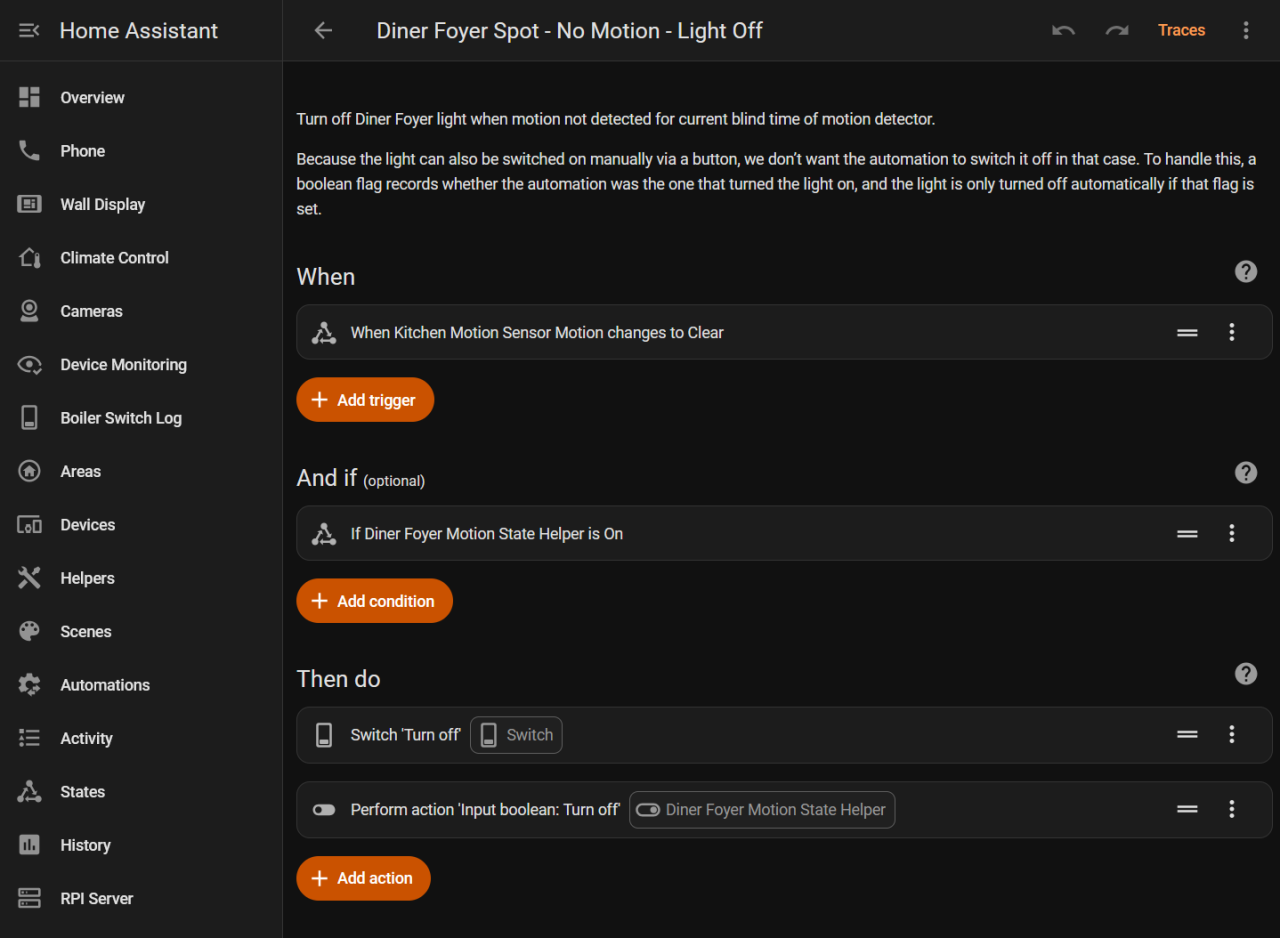
This second automation turns the light off when no further motion is detected:
Node Red
I have chosen to use two other platforms that are commonly used with Home Assistant: Node-RED and ESP Home.
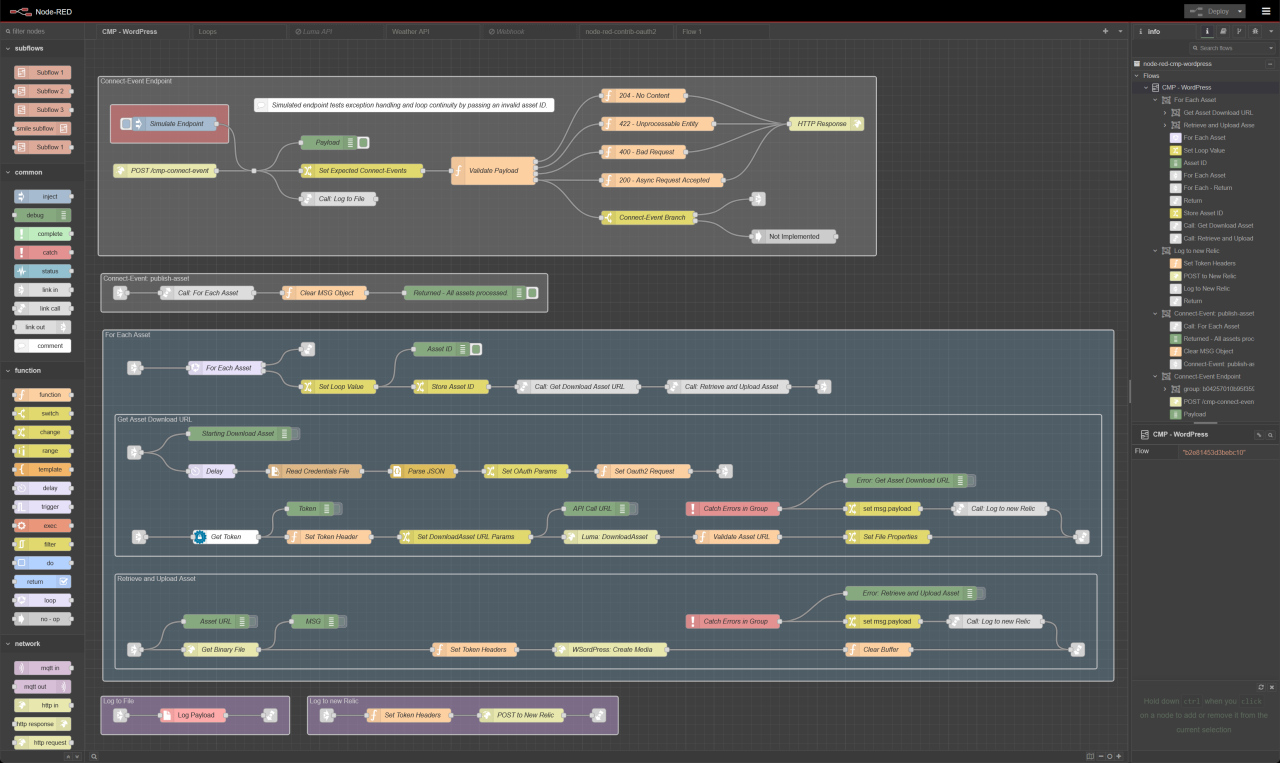
Node-RED is a low-code, visual programming tool for integrating hardware devices, APIs and online services, and in context of home automation allows you to visually create complex automations. It uses JavaScript and has a plugin system which allows you to install packages that add ‘nodes’ (the building blocks of your flow), thereby extending the functionality of Node-RED. This makes it a very powerful solution.
There is a package specifically for Home Assistant, node-red-contrib-home-assistant, that adds nodes that expose your Home Assistant hardware devices in Node Red.
I have not created any automations using Node-RED yet, although I have built a POC integration that connects to the WordPress API.
ESP Home
ESP Home is a locally hosted platform (Raspberry PI Server) that lets you configure and control microcontrollers through Home Assistant using simple YAML files, making it easy to integrate sensors, switches, and custom automation into your smart home. For example, if you have an ESP32 that is connected to some relays and sensors, you can read the sensors and control the relays in Home Assistant. This is extremely powerful!
I have not had the time to try ESP Home yet.
HACS
HACS (Home Assistant Community Store) is an integration that lets you easily install and manage custom components, themes, Lovelace cards, and other community-created add-ons within Home Assistant, without needing to manually copy files or edit YAML.
Why HACS Is Useful:
- Streamlined installation of third-party integrations and UI elements
- Automatic updates for custom components
- Curated community content with versioning and documentation
- Modular architecture
If you’re building a scalable Home Assistant setup, HACS is practically essential for tapping into the broader ecosystem.
Installation
In 2022 I started renovating our home, which gave me the chance to put in the infrastructure needed for home automation:
That mainly involved installing the wiring, control panels, back boxes, Ethernet points, and other essentials. As part of the project, I converted the garage into a study and electronics lab, and I removed and replaced all the old Artex ceilings in the foyer and open‑plan dining room. Doing that gave me full access to the ground‑floor wiring, including the kitchen and lounge.
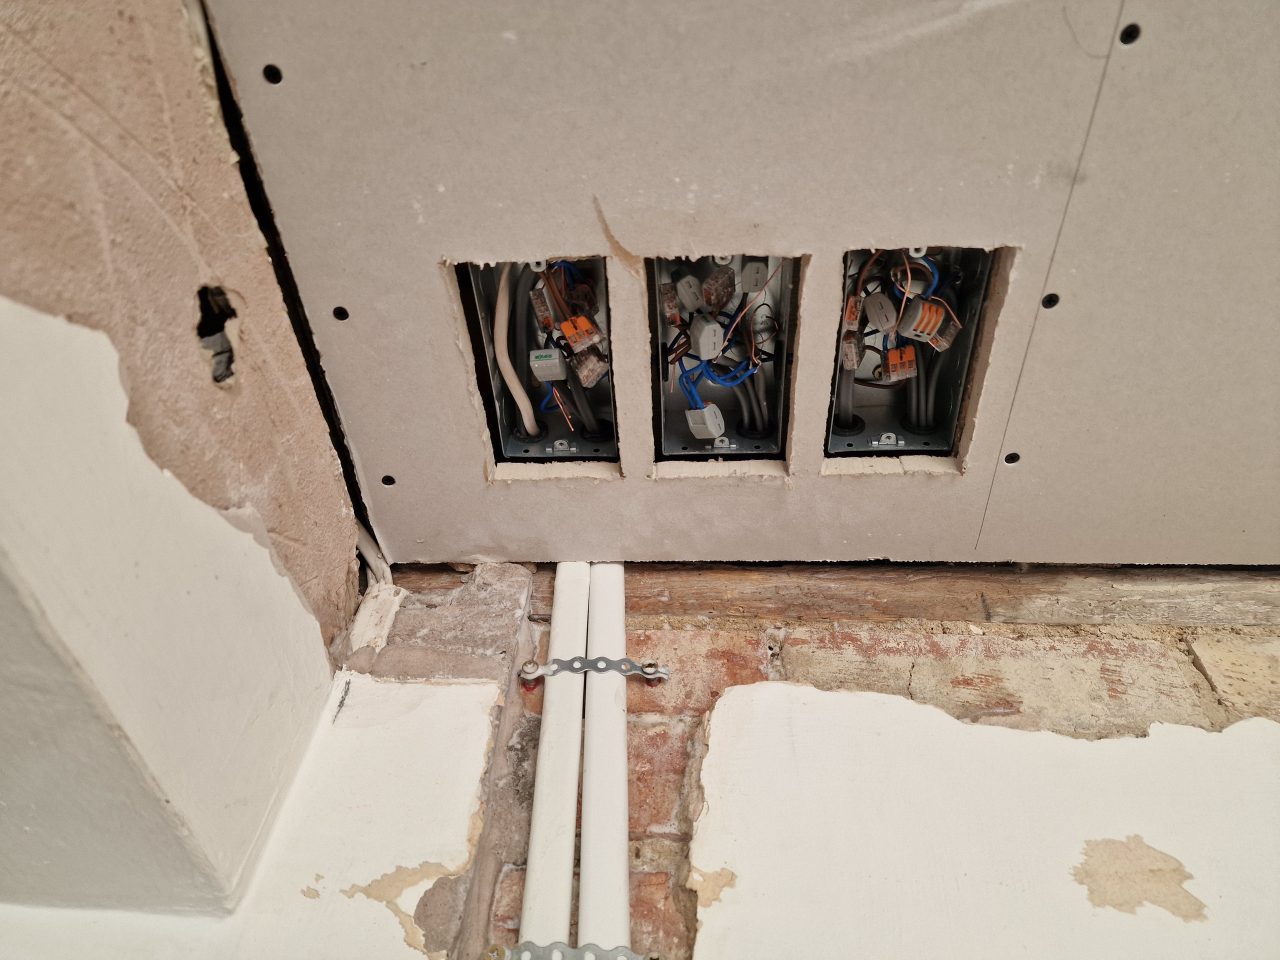
I have installed more than 30 devices so far throughout the house – dimmers, relays, humidity and temperature sensors, thermostatic radiator valves, door and window sensors, and motion detectors. Most of these require a neutral connection. In the UK light switches do not have a neutral cable, but Shelly have already found a solution to that for the Shelly Dimmer 2. It uses the leakage current of the lights across a capacitor to power the device. If the leakage current is too low, a bypass resistor can be connected across the light which provides the necessary voltage drop to power the circuit.
I have not needed to use this method yet, as I have been able to rewire all the light switches I currently control to include a neutral. In some cases I have access to the ceiling void and loft space, so I have added back boxes to house the dimmer, and routed neutral to that, instead of down to the light switch.
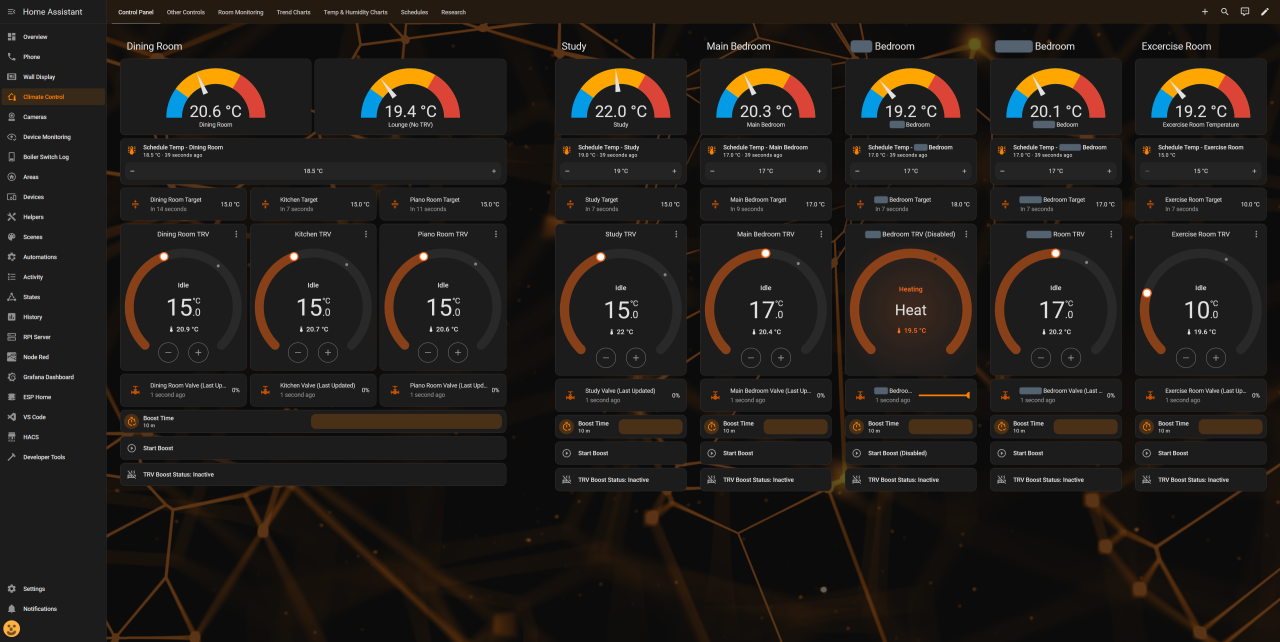
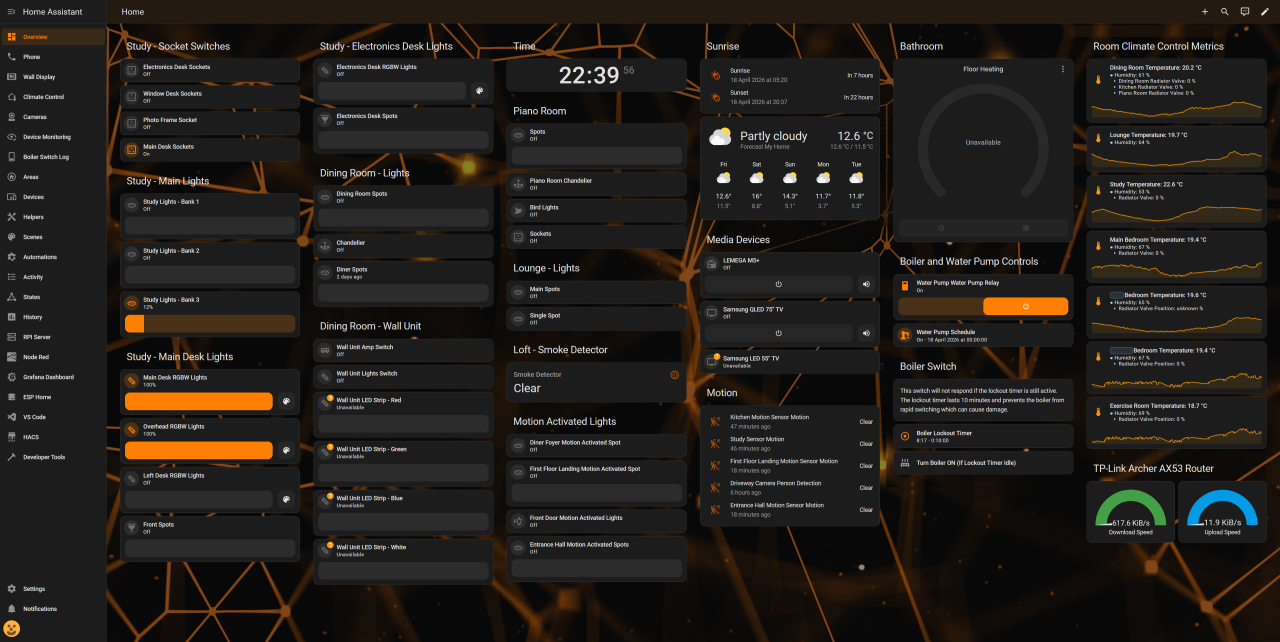
I installed Home Assistant in a Docker container on my Raspberry PI Server. I have a number of different dashboards for different purposes. The below dashboard is my overview dashboard and contains most of the devices:
I have configured some enhancements for Home Assistant by editing the configuration.yaml file:
MariaDB for the Recorder Database
Home Assistant uses an internal SQLite database for its default recorder, but SQLite has limitations in size and performance. Switching to MariaDB provides far greater capacity and performance for long‑term data storage and access:
# Use MariaDB in a Docker Container as the Recorder Database
recorder:
  db_url: mysql://username:password()@127.0.0.1:3307/homeassistant?charset=utf8mb4
  commit_interval: 1
  purge_keep_days: 365
auto_purge: trueInfluxDB for Grafana
Grafana is a visualisation and analytics tool that produces beautiful charts, but does not store data itself. InfluxDB is a high‑performance time‑series database designed for fast writes, long‑term retention, and efficient queries, and is well suited for Grafana. Together, they provide smooth, responsive dashboards and reliable storage for sensor and metric data:
# Connect to InfluxDB2.8 for metrics
influxdb:
  api_version: 2
  host: 192.168.1.XXX
  port: 8086
  token: "************************************************************************"
  organization: "home"
  bucket: "homeassistant"
  ssl: false
verify_ssl: falseSidebar Panel Additions
Quality of life additions to the left hand sidebar panel:
panel_custom:
  - name: Automations
    sidebar_title: Automations
    sidebar_icon: mdi:cog-transfer
    js_url: /api/hassio/app/entrypoint.js
    url_path: config/automation/dashboard
    embed_iframe: true
    require_admin: true
    config:
      ingress: core_configurator
  - name: Devices
    sidebar_title: Devices
    sidebar_icon: mdi:devices
    js_url: /api/hassio/app/entrypoint.js
    url_path: config/devices/dashboard
    embed_iframe: true
    require_admin: true
    config:
      ingress: core_configurator
  - name: Scenes
    sidebar_title: Scenes
    sidebar_icon: mdi:palette
    js_url: /api/hassio/app/entrypoint.js
    url_path: config/scene/dashboard
    embed_iframe: true
    require_admin: true
    config:
      ingress: core_configurator
  - name: Areas
    sidebar_title: Areas
    sidebar_icon: mdi:home-circle-outline
    js_url: /api/hassio/app/entrypoint.js
    url_path: config/areas/dashboard
    embed_iframe: true
    require_admin: true
    config:
      ingress: core_configurator
  - name: develop_states
    sidebar_title: States
    sidebar_icon: mdi:state-machine
    url_path: 'config/developer-tools/state'
    module_url: /api/hassio/app/entrypoint.js
    embed_iframe: true
    require_admin: true
  - name: panel_develop
    sidebar_title: Developer Tools
    sidebar_icon: mdi:hammer
    url_path: 'config/developer-tools/yaml'
    module_url: /api/hassio/app/entrypoint.js
    embed_iframe: true
    require_admin: true
  - name: panel_develop
    sidebar_title: Helpers
    sidebar_icon: mdi:tools
    url_path: 'config/helpers'
    module_url: /api/hassio/app/entrypoint.js
    embed_iframe: true
    require_admin: true
  - name: panel_boiler_switch
    sidebar_title: Boiler Switch Log
    sidebar_icon: mdi:toggle-switch-variant-off
    url_path: 'logbook?entity_id=switch.boiler_control_relay'
    module_url: /api/hassio/app/entrypoint.js
    embed_iframe: true
    require_admin: true
  - name: node-red
    sidebar_title: Node Red
    sidebar_icon: si:nodered
    module_url: /local/panel-redirect.js
    config:
target: "http://192.168.1.XXX:1880"Boiler Binary Value for Charting
The boiler is controlled by a Shelly Plus 1 relay, which appears in Home Assistant as a switch. It’s useful to plot the relay state alongside temperature data on a chart, but switches can’t be graphed directly. This template converts the relay state into a numeric value, 0% when off and 100% when on, so it can be displayed on a chart.
# Expose the Boiler Switch as a Sensor for Graphing
template:
  - sensor:
      - name: "Numeric Boiler Relay State"
        unique_id: numeric_boiler_relay_state
        unit_of_measurement: "%"
        state_class: measurement
        state: >
          {% if is_state('switch.boiler_control_relay', 'on') %}
            100
          {% elif is_state('switch.boiler_control_relay', 'off') %}
            0
          {% else %}
            0
{% endif %}Signal Notifications
I have the Signal CLI deployed in a Docker container. The code below makes calls to the relevant endpoint to send a message to any phone number or group.
To set this up you need a temporary SIM card with it’s own number. Once the docker container is deployed, you scan a QR code that is generated by the following endpoint:
http://192.168.1.XXX:8090/v1/qrcodelink?device_name=signal-apiThis links the Docker CLI to the phone Signal account, similar to linking WhatsApp on a PC. Once linked, a test message can be sent using the following command:
curl -X POST -H "Content-Type: application/json" 'http://192.168.1.100:8090/v2/send' -d '{"message": "Hello World", "number": "+44XXXXXXXXXX", "recipients": [ "+44XXXXXXXXXX" ]}To use this in Home Assistant, add the following to the configuration.yaml file:
# Signal Notifications
notify:
  - name: signal
    platform: signal_messenger
    url: "http://192.168.1.XXX:8090"
    number: "+440000000000"
    recipients:
      - "+449999999999"
  - name: signal_alert
    platform: signal_messenger
    url: "http://192.168.1.XXX:8090"
    number: "+440000000000"
    recipients:
      - "group.***********************************************************="
  - name: signal_log
    platform: signal_messenger
    url: "http://192.168.1.XXX:8090"
    number: "+440000000000"
    recipients:
      - "group.***********************************************************="
  - name: signal_debug
    platform: signal_messenger
    url: "http://192.168.1.XXX:8090"
    number: "+440000000000"
    recipients:
- "group.***********************************************************="You can create groups in Signal. After creating a group, to obtain the group IDs, use the following command with the number of the temporary SIM card:
http://192.168.1.XXX:8090/v1/groups/+44XXXXXXXXXXApplications
Study Power
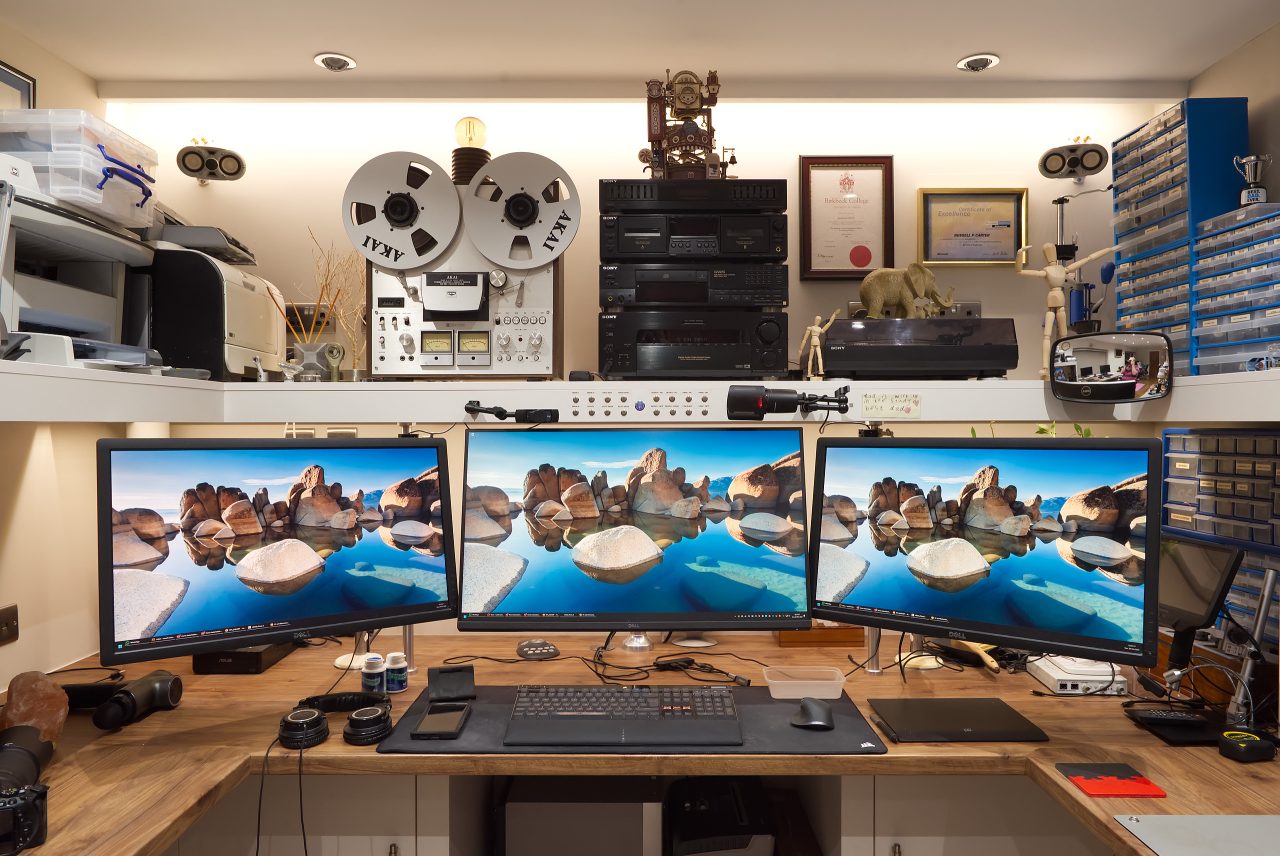
Between the electronics desk with all of my test and measurement equipment, and my PC with all of its peripherals, I have many devices plugged into the mains. I have sockets all over the place to avoid the use of power strips / multi-way extension cords.
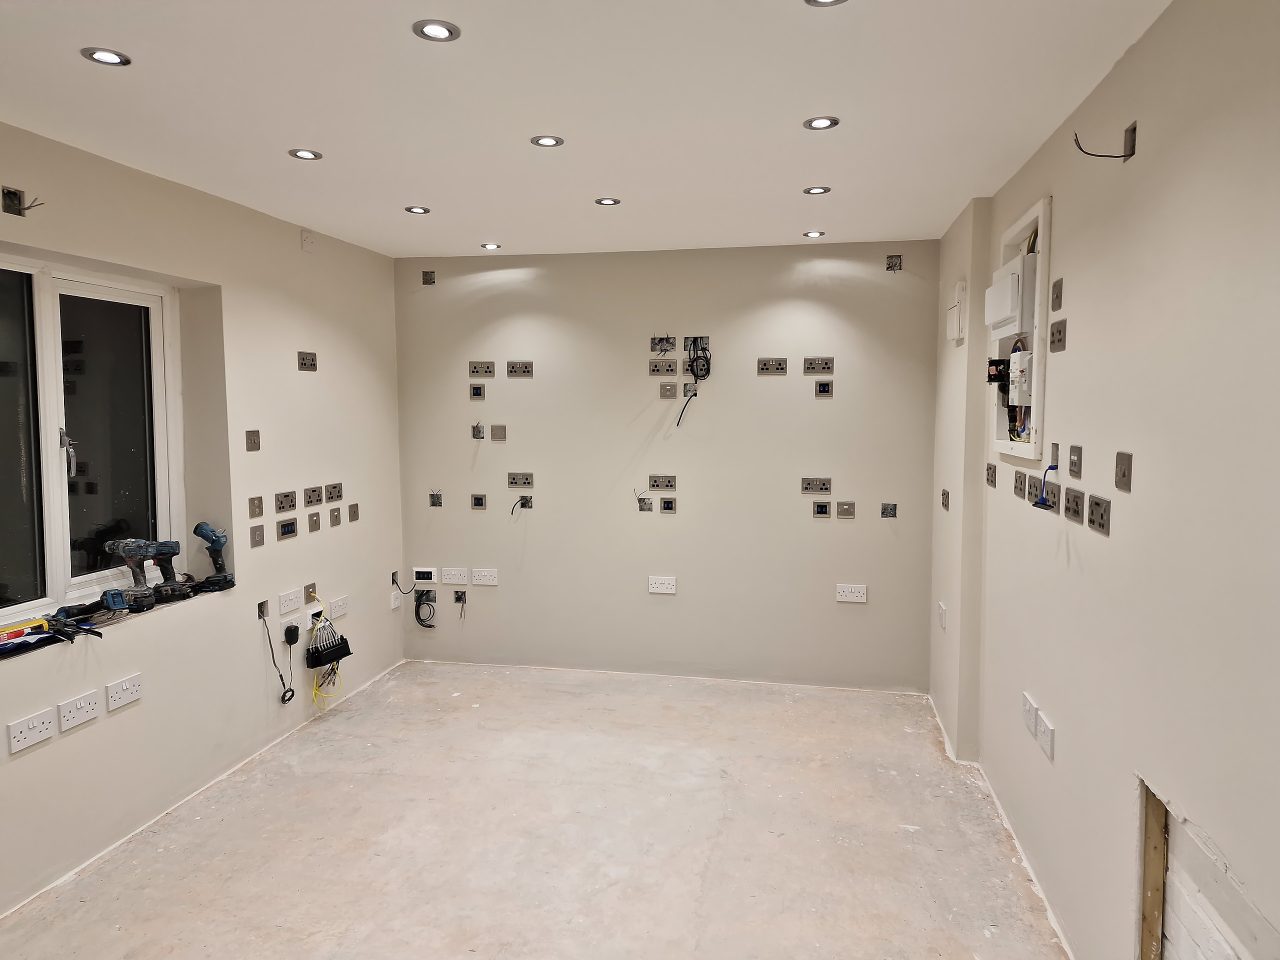
In the photo above, the boxes are not all mains sockets – there are a number of USB, speaker, ethernet and other outlets.

See the Study & Electronics Lab panorama for the bigger picture.
It would not be feasible to switch individual sockets on and off every day, and I am not prepared to leave all this equipment on permanently for two reasons: Fire risk and wasted energy. To allow me to switch all sockets on or off at once (without simply switching the RCBO in the consumer unit off), I installed a small consumer unit with 3 20A contactors (essentially high power relays), controlled by 3 Shelly relays. Each contactor serves a radial 4mm2 circuit.
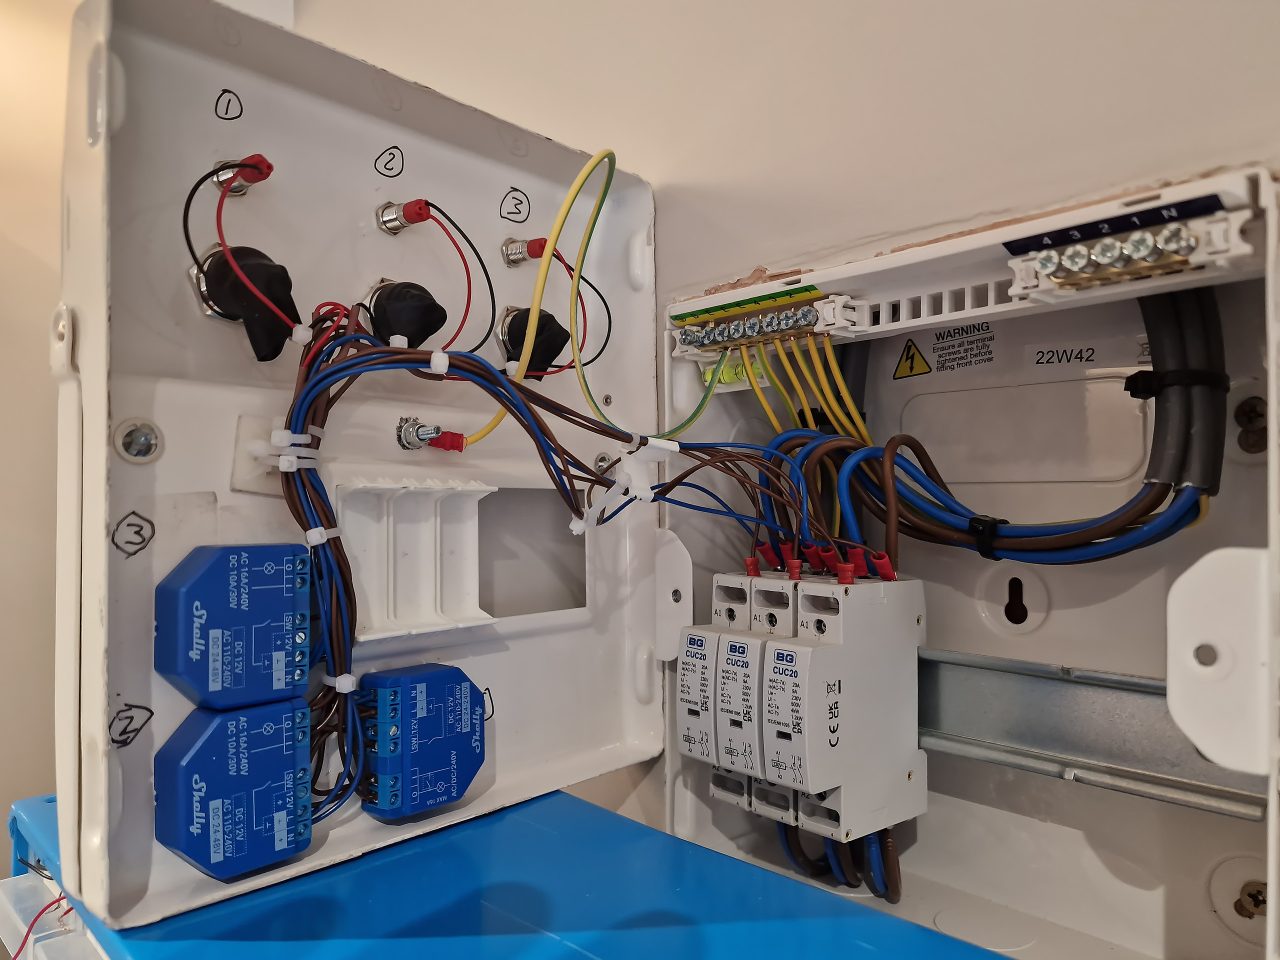
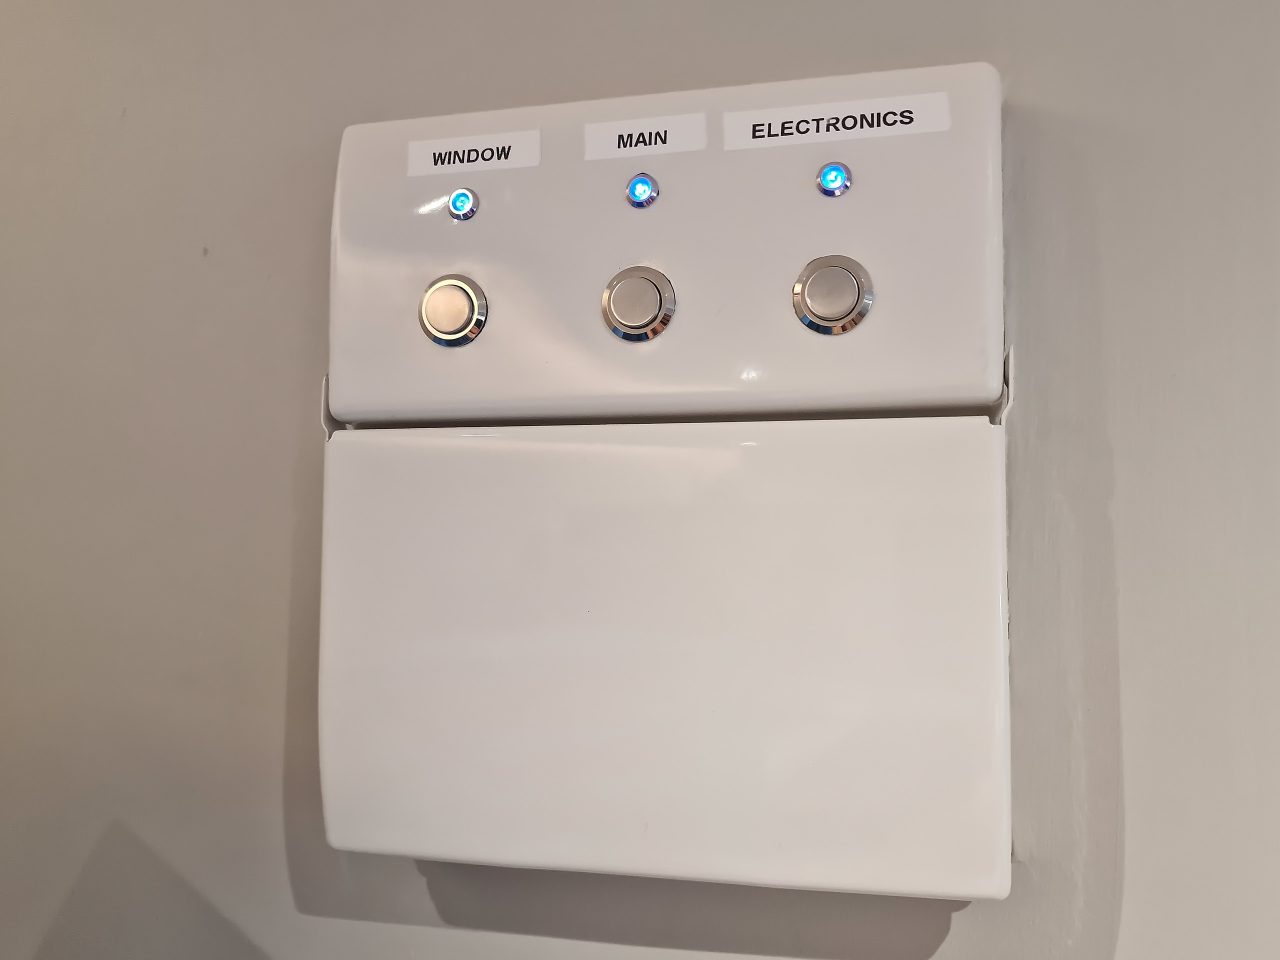
The mains sockets are split into 3 zones: Main PC desk; electronics desk and all sockets down the left along the windows. I can now switch zones on and off as necessary from the panel itself, my phone, or any Shelly enabled button or control panel.
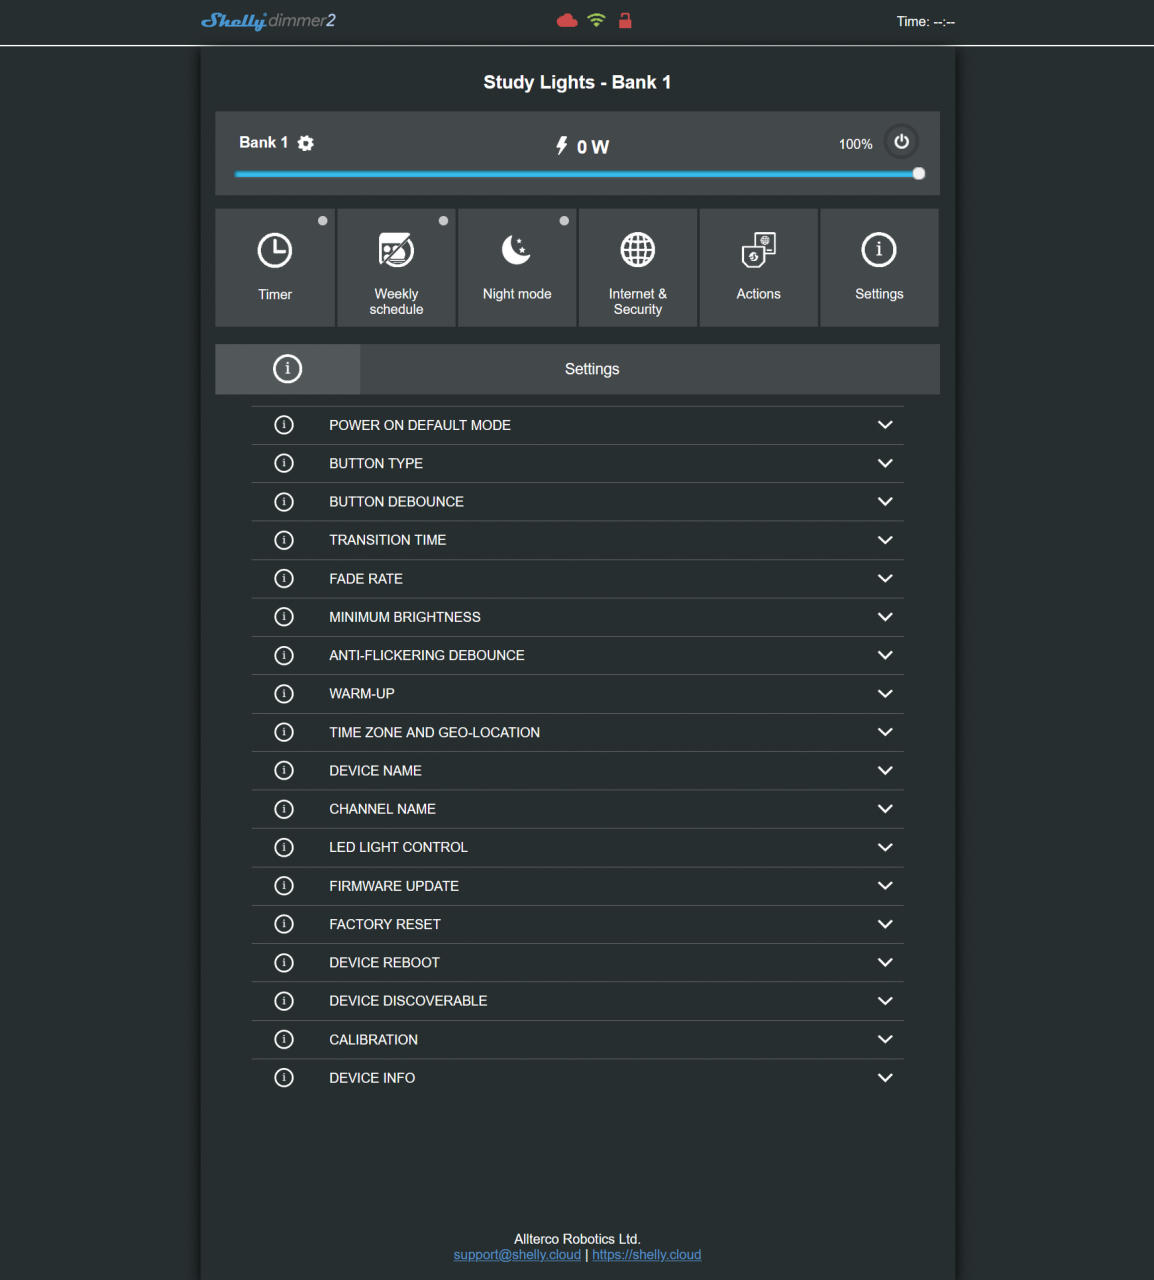
Study Lights
When I did the garage conversion, I added a control cabinet into the utility storage cupboards side of the partition wall to house the shelly devices.
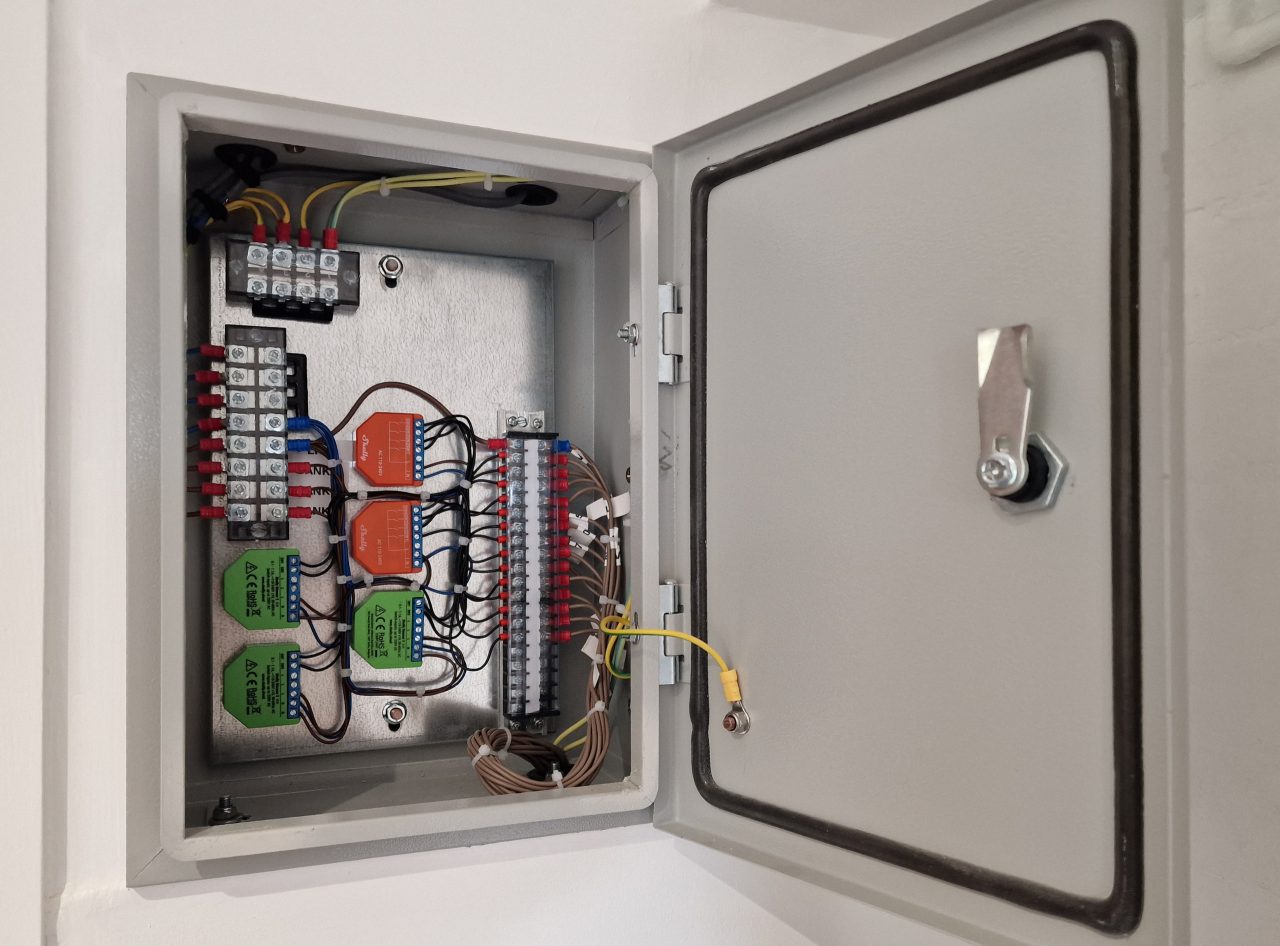
The cables for the 3 banks of spotlights for the study feed into the top of the cabinet, along with live and neutral. When I was young I worked as an industrial control panel wirer, and I was able to use those skills here to layout the Shelly devices and wire them up. Using connection blocks is standard and allows me to remove the back-tray if required.
Interestingly the WiFi signal has no problem getting through the metal enclosure, although I do have a WiFi extender close by. It will definitely attenuate the signal to a degree though. The dimmers in the below photo have an RSSI of between -45dBm and -60dBm, which is significantly higher than the advised lower limit of -80dBm, and within the -30dBm to -67dBm window for reliable operation.

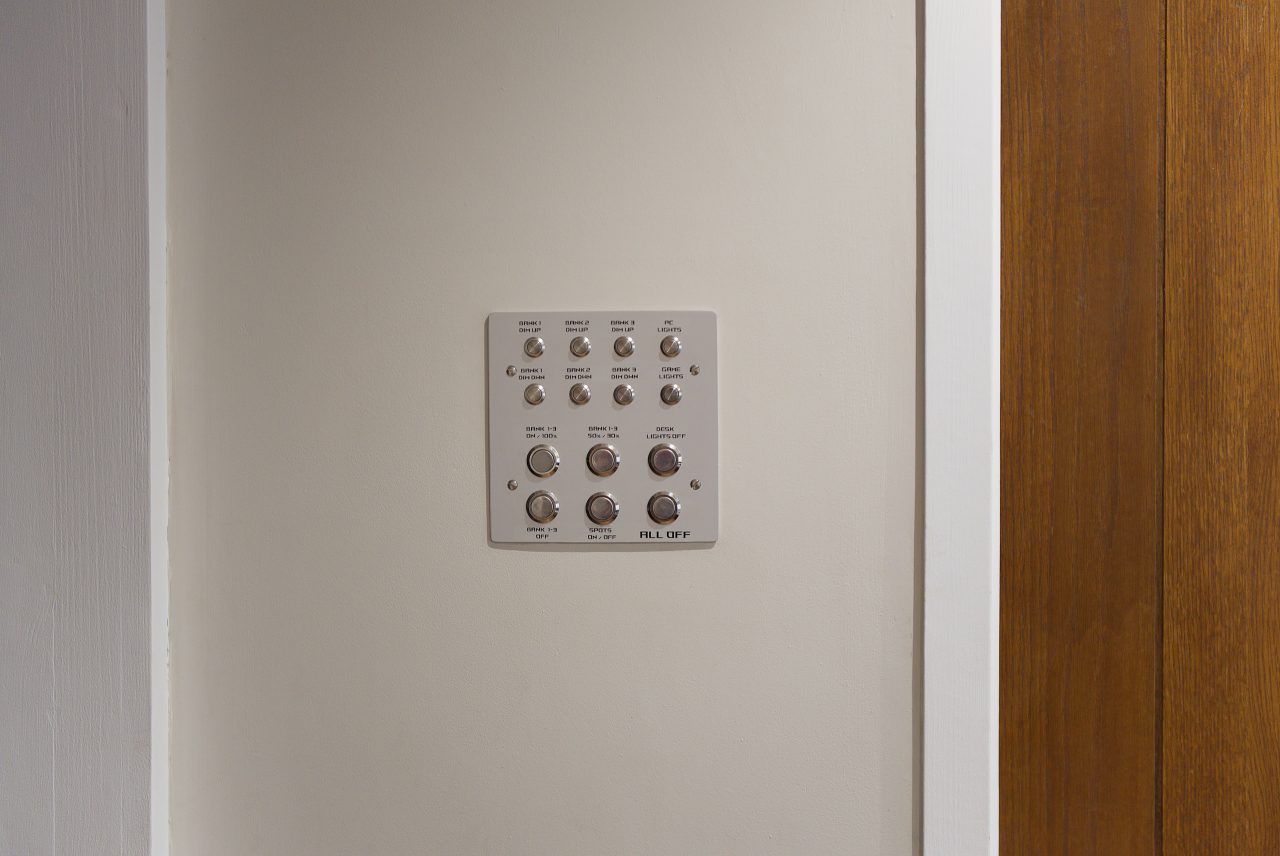
The cables exiting from the right-hand of the back-tray and through the bottom go to the switch panel on the other side of the wall.
The final product. The first 6 buttons from the top left control the 3 banks of lights directly. The remaining buttons are programmable and can activate scenes or automations, or anything else I configure. They connect to Shelly i4s, which are devices that simply handle button pushes and relay that information to Home Assistant to be assigned a function.
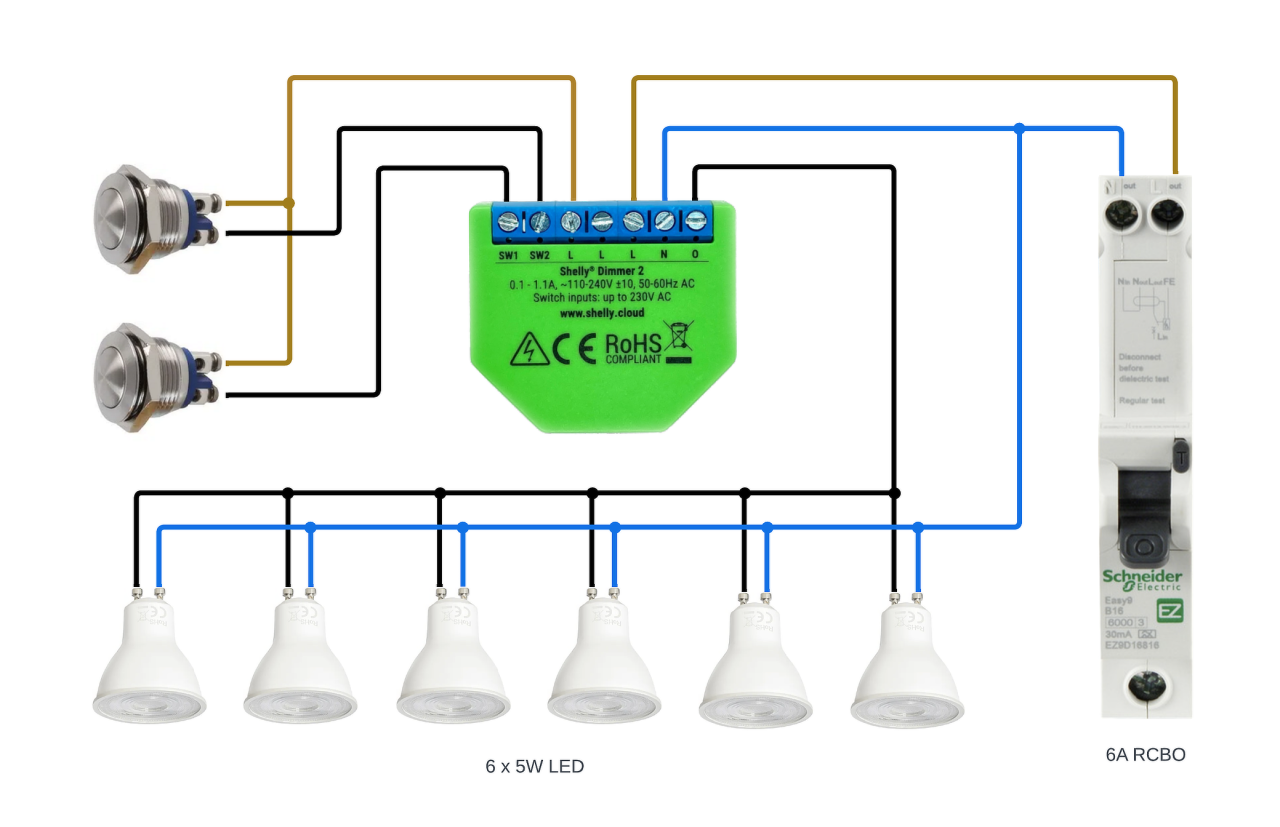
Simplified diagram of one bank of lights:
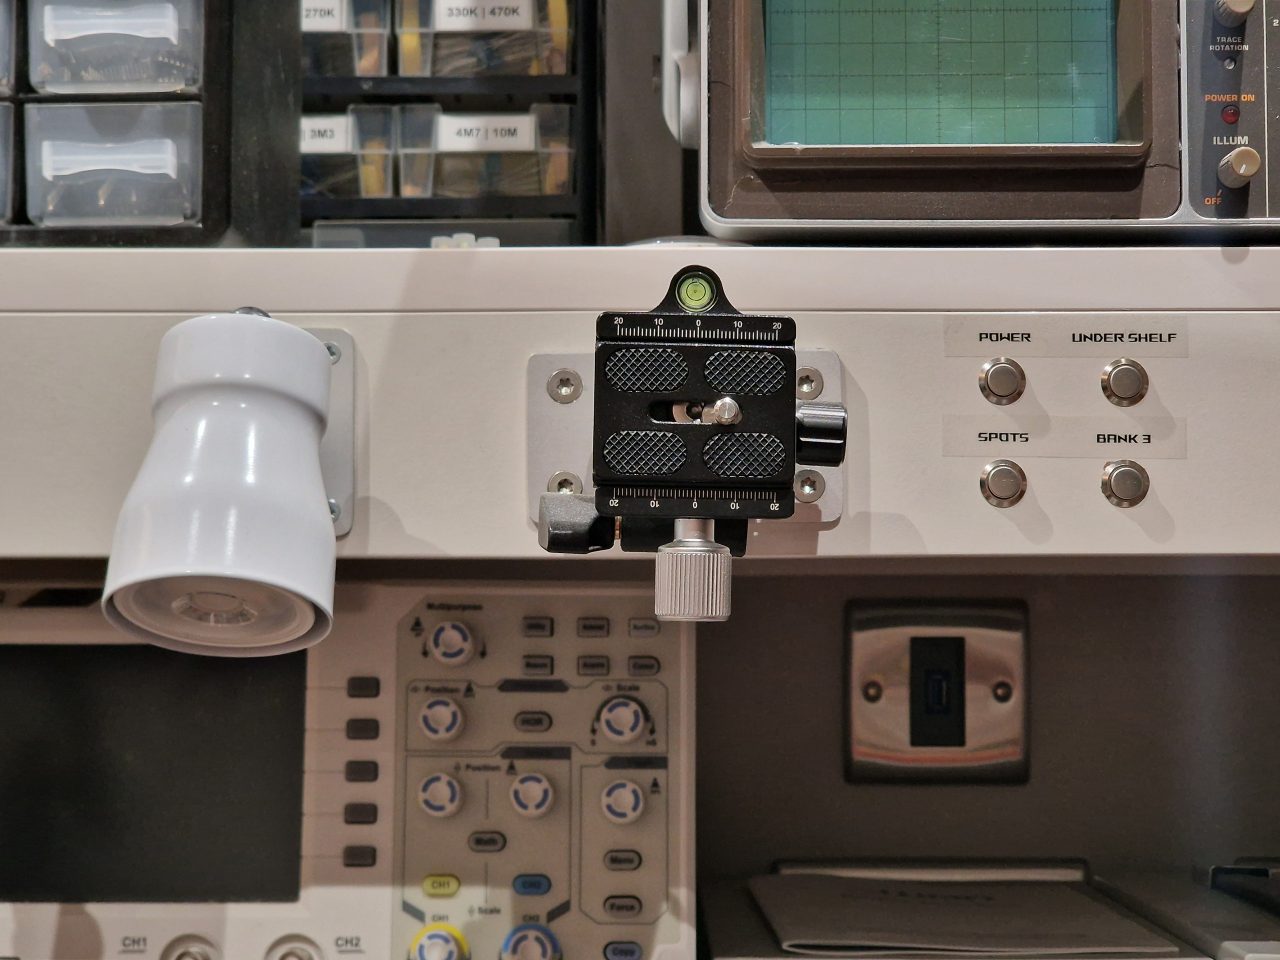
Study Desk Lights & Controls
For the desks I have RGBW LED strip lighting, controlled by a Shelly RGBW 2 controller. I have a strip running underneath the top shelf as well as along the ceiling behind a wooden beam. This provides a nice backlight for my monitors, considering the windows are behind me to my left.
Mounted on the shelf support above my monitor are 16 buttons wired to four Shelly i4 DC devices. These are powered by the LED strip power supply, which is overrated so can power the additional load with ease – not that they draw much current anyway.
These control both the LED strip lights and the main lighting. Each button triggers a Home Assistant scene, and thanks to Shelly’s multi-action support – single press, double press, triple press, and long press – each button can activate up to four distinct scenes. To keep things intuitive, I typically assign one button to control a specific light group, while the alternate press types adjust brightness levels.
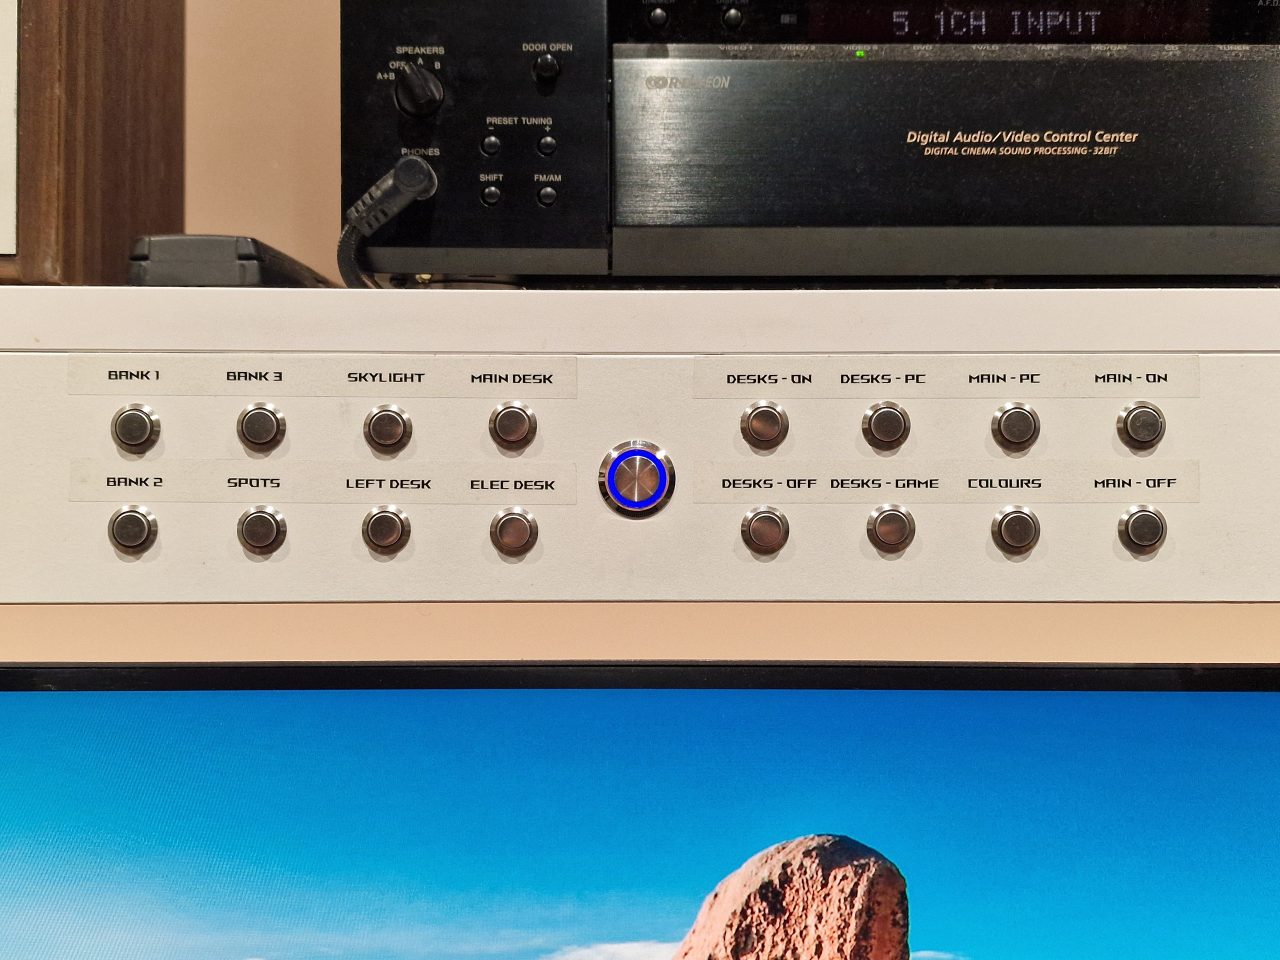
The larger middle button with the blue LED ring is the power button and LED for my PC, which is hidden in a ventilated cupboard down to the left under the desk.
I have a smaller set of controls with one Shelly i4 DC above the electronics bench to control the main lights above the desk, the under-shelf strip lights and the shelf-mounted spotlights.
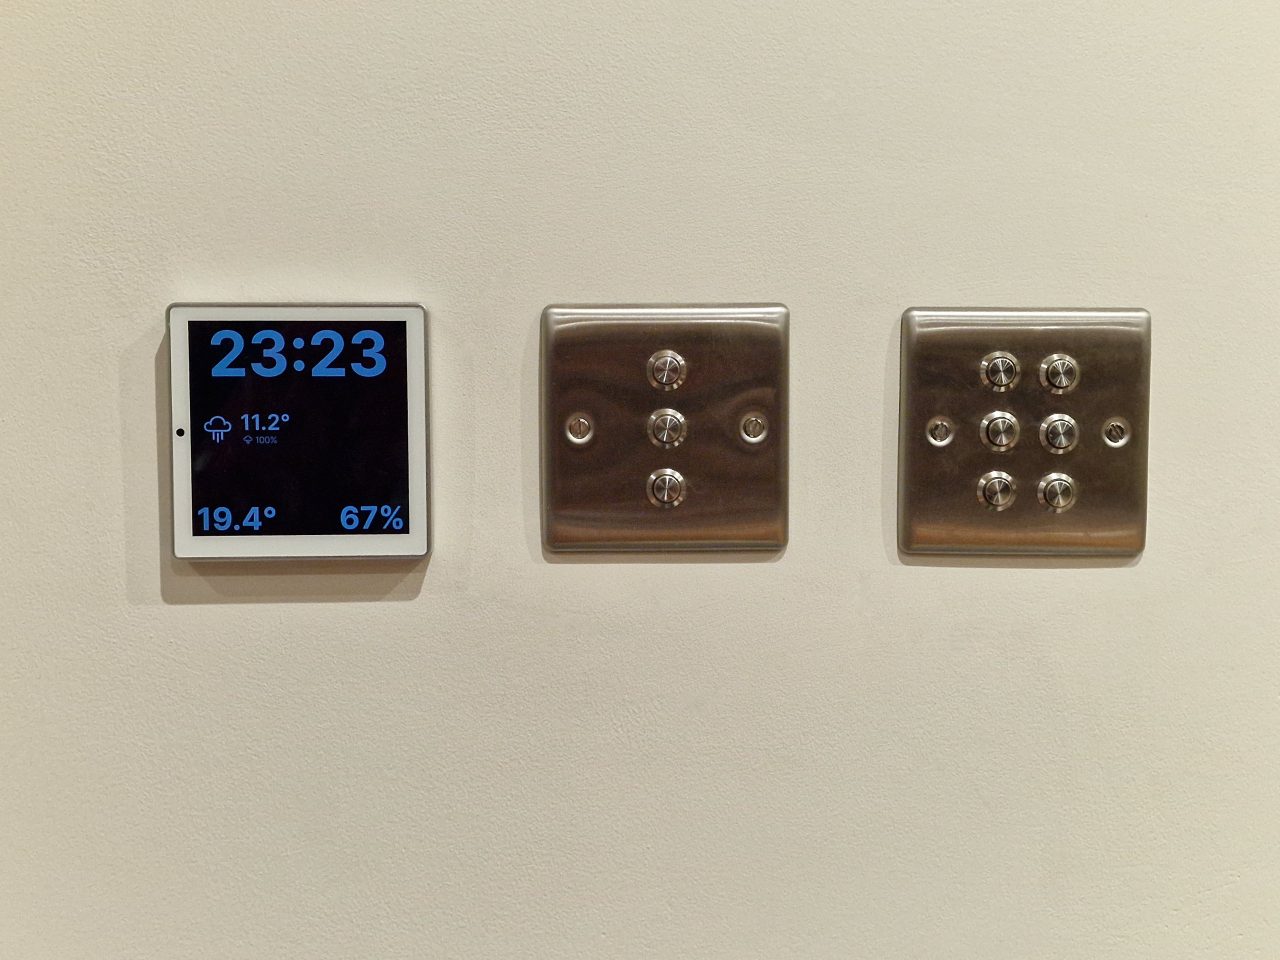
Dining Room Controls
I have installed and configured a Shelly Wall Display to show my Home Assistant dashboard, giving me full control over lighting and scenes for any device in the house. I’m planning to add Shelly TRVs to manage the radiators, and once I’ve configured heating zones and schedules, I’ll be able to control those from the display too. I of course also have access to Home Assistant on my phone.
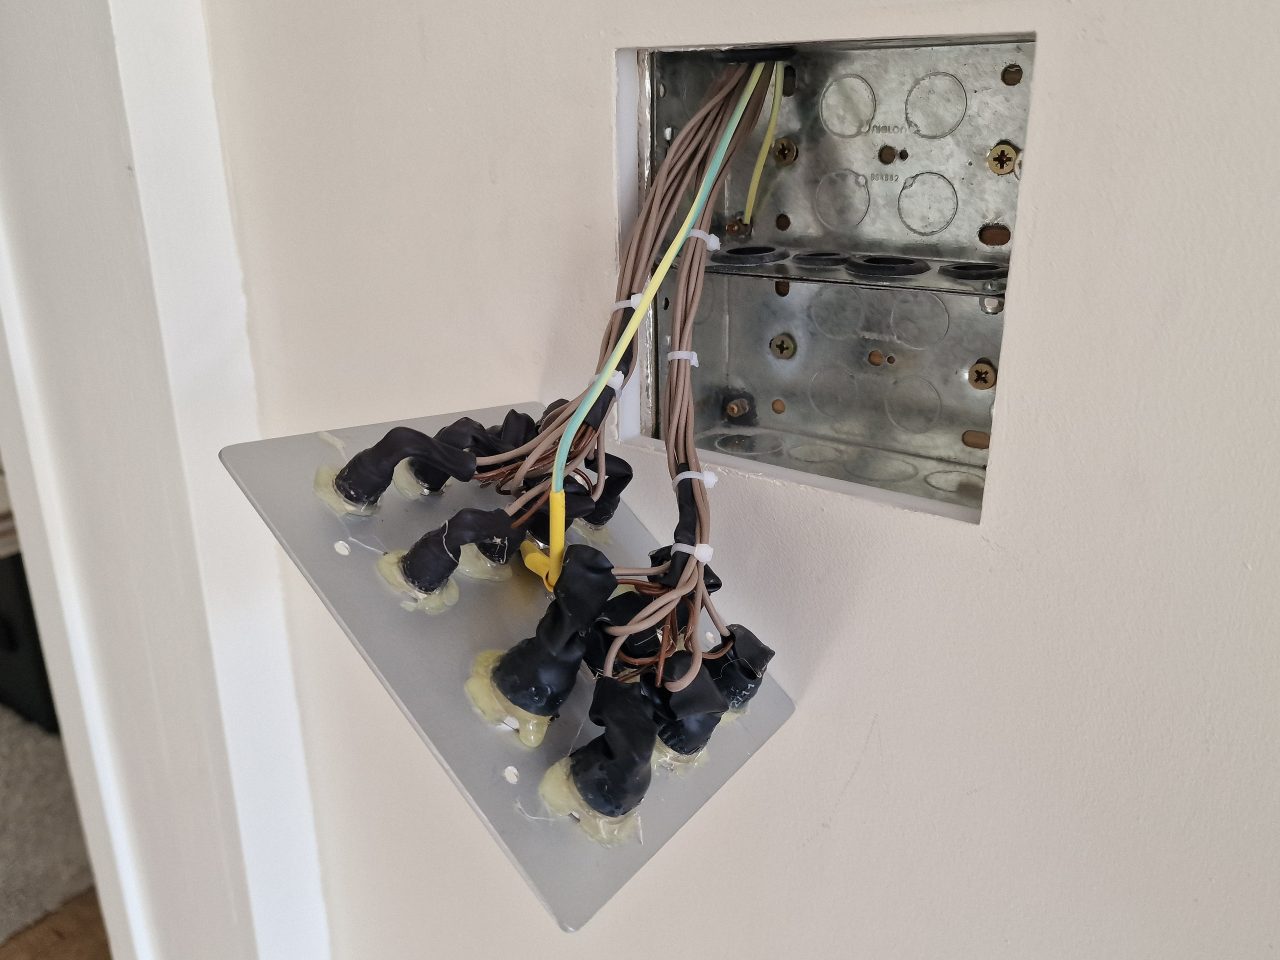
To the right of the Shelly Wall Display are the directly connected home-made buttons for the dimmers and relays (these are well earthed!). It’s prudent to have these available in case the Home Assistant server (Raspberry PI) goes down, and to be honest it is much easier switching the light on and off with a dedicated button. The top and bottom buttons control the dimmer for the spotlights, and the middle button controls the relay for the chandeliers. There are 3 sub-rooms (open plan), therefore 3 sets of buttons.
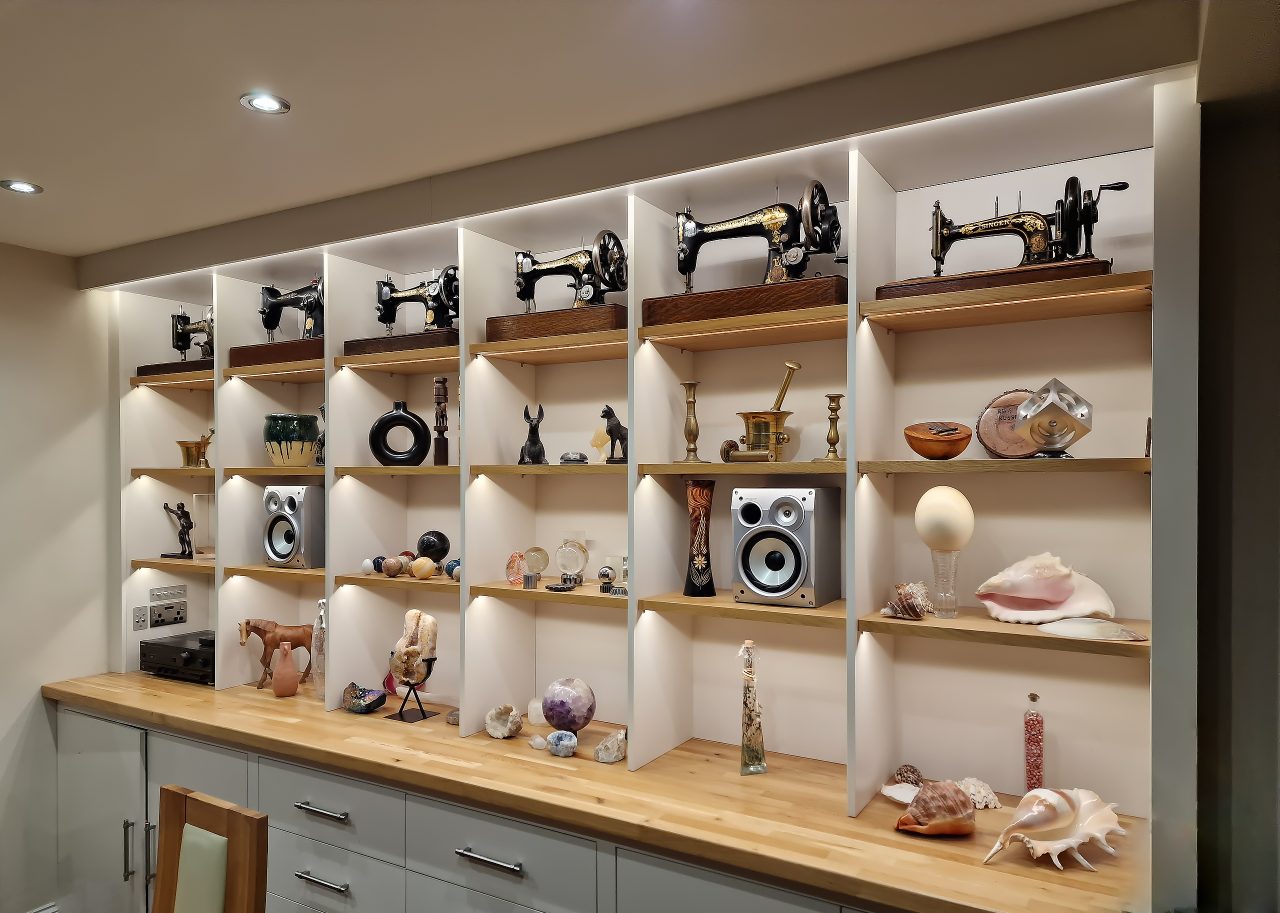
Dining Room Wall Unit
I built a Dining Room Wall Unit, which features recessed RGBW LED strip lighting under each shelf, controlled by a Shelly RGBW2 and an LED lighting amplifier, as the power demand is greater than what the RGBW controller can provide natively.
The version of the Shelly RGBW2 I used can accommodate potentiometers for controlling the 4 channels. In the photo below you can see a panel I created with the 4 potentiometers. The firmware allows for overriding the potentiometer values and vice versa, so whatever control method you use overrides the other.
Hive Heating Replacement
See my Hive Heating Replacement project for details of how I replaced Hive with Home Assistant and Shelly TRVs (thermostatic radiator valves).